Heading Slats

The type face we use for heading slats have been selected for their readability. However if you wish to specify your own chosen font you are welcome to do so from a wide range of standard typefaces and unlimited colours.
Special designs and effects can be used on doubled heading slats, such as a marble pattern or a rainbow spectrum.
Item Slats
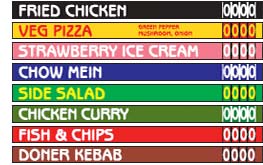
These are used to display menu items and prices. We always recommend that the colour of these item slats compliments that of the frame. For example if you have a golden frame, black slats will compliment it well.
For maximum impact the colour of the text should contrast well with the slat. For example yellow text on a black slat will achieve the desired result, with white text also being a good option on most colours, apart from yellow.
The typeface we recommend for its readability and fast food style is Benguiat Gothic.
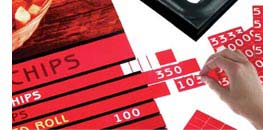 Slat Holders
Our slat systems incorporate special panel runners which allow slats (such as price slats) to be changed easily, as well as finishing the display. For your convenience all of our menus are supplied with a price sticker pack to enable you to quickly update any of your prices.
Frames
Frames are available in a wide selection of colours in order to match your slats and to compliment your interior décor. Many of our customers have used frame colours to add extra impact to their food images. For example, in an Ice Cream parlour a pink frame would suit the image and décor, as would a green frame in a Salad Bar. Yellow frames are most successful with Snack and Sandwich bars. In Burger and Kebab shops red flames are often used, as are black and gold flames in Pizza and Fried Chicken emporiums.
We are always happy to offer our expert advice on your frame colour selection.
Installation Instructions
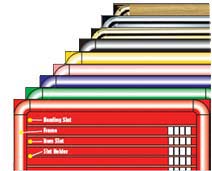
Our modular menu systems are simplistic and very easy to use. Each box comprises of four parts1: The Panel – which holds your text slats and transparency.
2: The Frame – This is where the picture and slat panels are held and can easily be detached from the main box unit.
3: The Light Box – This is constructed from aluminium and contains all of the electric fittings.
4: Slats and Transparencies – These are fitted behind non-reflective clear panels, which enables easy cleaning from the outside.
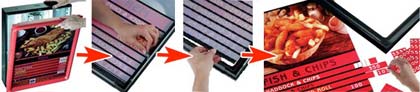
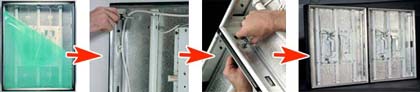
Easy Access to Transparency, Slats and Prices
If you wish to reach the panel, you simply need to pull the frame off the box unit. To do this, just undo a few clips to detach the panel and then the transparency and slats can be easily changed and re-installed within a few minutes.
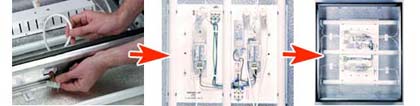
Connecting Boxes
To connect boxes, on any side simply attach the units to each other by using the fixing bolts supplied. Electrical connections are done so by plug-in leads between boxes.
Electronics
Depending on the size of the unit, power consumptions will range from 30 to 100 Watts, with just the one electrical feed is required for an average system. All ouf our fittings comply the relevant safety standards and use standard lamps.
Menu System Wall Fixing
1: Record the total size of your menu system and the available space that you have to fit it. Then mark the starting point and the level of your menu system.
2: Fix the first bolt through the box back sheet and your wall using appropriate fixing screws.
3: Remove the two black plugs and join the next box by using the supplied wing bolt and nut connectors.
4: As per step two, fix the next box to the wall.
5: Continue to bolt the boxes together to continue fixing them until the menu system is complete.